Comment from 2023 - stop suffering with 3ds Max, that's why. The following is the original article
In this lesson we will delve into the wilds of V-Ray and analyze its most subtle settings in order to learn how to optimize rendering and get a high-quality image in less time.
Introduction
This tutorial is designed to cover and explain the entire process of optimizing V-Ray settings to produce high-quality renders in less time.
There is often a lot of confusion around the term V-Ray sampling and what the “ideal” settings are. Most renderers create a “Universal V-Ray Settings” in which they set the Image Sampler (Anti-Aliasing, or AA) Max subdives to a very high value, about 50 or even 100, then simply lower the noise threshold value until the render is clean enough, thinking that this is the best way to achieve the optimal quality/speed ratio. But with a little understanding of what's under the hood of V-Ray and how it actually works, you can get better images in less render time. The method that I will describe in this article, in comparison with the most common one that I described above, in some scenes can save your rendering time by 3 to 13 times.
Well, first let's look at some basic things about how rendering itself and V-Ray sampling work. Next, we'll move on to a specific scene to demonstrate how to optimize rendering to be faster, better, and sharper. Then we'll learn to identify the different types of noise that may be in a scene. And at the end, I'll show you a step-by-step procedure for optimizing any scene to get the perfect balance between quality and speed.
If you already know how V-Ray works, click here to jump straight to the step-by-step optimization procedure.
RAYTRACING (ray tracing)
When rendering begins, rays are shot from the camera into the scene to collect information about the geometry in the scene, which will be visible in the final image. These rays are directed away from the camera and are called Primary Rays (Sometimes Camera Rays or Eye Rays) and are configured in Image Sampler (also known as Anti-Aliasing or AA).
While the Primary Ray intersects the scene geometry, additional rays are fired from these intersection points into other areas of the scene to obtain information about lighting, shadows, indirect illumination (GI), reflections, refractions, subsurface scattering (SSS), etc. These additional rays are called Secondary Rays and configured in V-Ray's DMC Sampler.
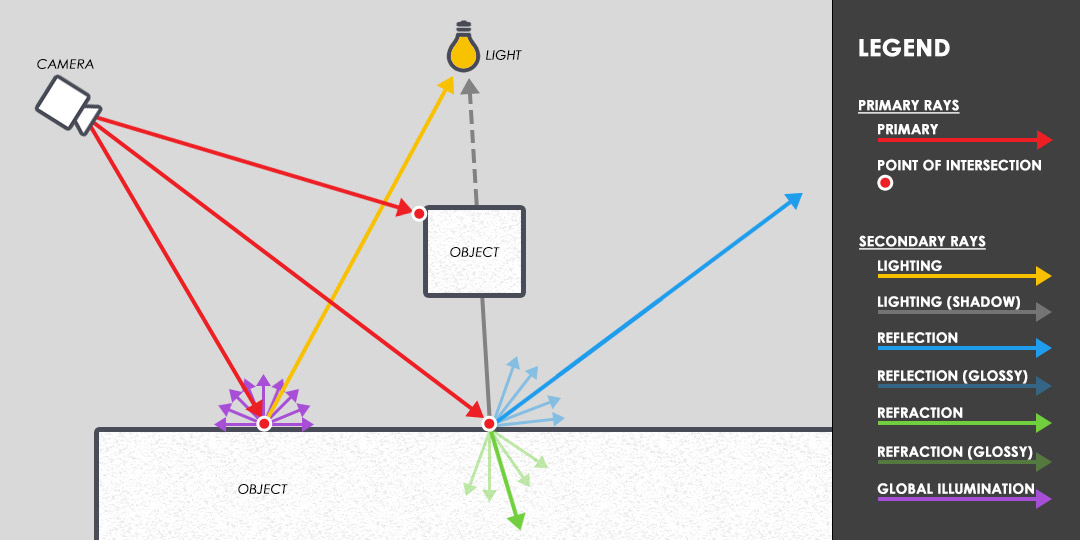 Figure 1. A simplified raytracing diagram: Primary Rays are fired from the camera into the scene, intersect with objects in the scene, and spread Secondary Rays to other parts of the scene.
From now on, we will refer to “Rays” as “Samples”, because the purpose of a ray (Ray) is to obtain information about the “Sample” scene. Rays = Samples.
To understand what is happening in the scene, you need to release a bunch of Primary and Secondary Samples. The more Samples, the more V-Ray receives information about the scene, accordingly, the higher quality the render will be and the less it will contain noise. As you can see, noise is the reason for the lack of information about the scene. If there is noise in the scene, then V-Ray did not have the opportunity to collect enough information about the scene. To sum it up: To remove noise you need to give V-Ray more information, and to give the renderer more information about the scene you need to make the Samples value larger.
Number of Primary Samples, regulated by values Min Subdivs, Max Subdivs, And Color Threshold in the Image Sampler options. The number of Secondary Samples is controlled by the value Subdivs individually in each light source, GI, material and settings Noise Threshold DMC Sampler value. (Noise Threshold in Maya is called Adaptive Threshold)
So, let's repeat the basic terms:
Ray = Sample
Primary Samples = samples customized by V-Ray's Image Sampler (also known as Anti-Aliasing or AA), designed to determine the geometry of the scene and collect information such as textures, depth of field (DOF), and motion blur).
Secondary Samples = samples customizable by V-Ray's DMC Sampler, designed to collect information about lighting, GI, shadows, reflections, refractions and SSS
Noise = noise or lack of information
Subdivs = square root of the actual number of Samples. Subdivs^2 = Samples. Example: 8 Subdivs = 64 Samples. (8^2 = 64)
In this tutorial we'll look at how best to use these Primary and Secondary Samples to get a noise-free image in a short amount of time.
Definition THE SAMPLERATE RENDER ELEMENT
The SampleRate render element is one of the most important tools we will use to optimize rendering. This is V-Ray's way of showing us what the Image Sampler (AA) is doing at a particular pixel. It does this by marking each pixel with a color corresponding to the number of Primary Samples (AA) it contains. This image can be viewed in the SampleRate render element)
*Blue color means a small amount of Primary Samples (AA) in this pixel.
*Green color means the average number of Primary Samples (AA) in this pixel.
*Red color means a large number of Primary Samples (AA) in this pixel.
 Figure 2. The SampleRate render element (right) shows how many Primary Samples were used in each render pixel (left)
So, for a scene with Image Sampler (AA) 1 min and 10 max Subdivs (1 min and 100max Primary Samples):
*Blue color means 1 Primary Samples (AA) in this pixel.
*Green color means 50 Primary Samples (AA) in this pixel.
*Red color means 100 Primary Samples (AA) in this pixel.
And, for a scene with Image Sampler (AA) 1 min and 100 max Subdivs (1 min and 10000max Primary Samples):
*Blue color means 1 Primary Samples (AA) in this pixel.
*Green color means 5000 Primary Samples (AA) in this pixel.
*Red color means 10000 Primary Samples (AA) in this pixel.
Scene example - how does V-RAY work?
In this tutorial we will be working with a simple scene consisting of: a plane with several spheres on it, several different simple materials (including diffuse, glossy reflection, glossy refraction, and SSS), two area lights and a domelight with HDRI . GI enabled in Brute Force + Light Cache mode. You can download this file Here.
We'll start with basic render settings with the following values:
- Image Sampler (AA) = 1min & 8max Subdivs.
- Lights, GI, and Materials all 8 Subdivs.
- Noise Threshold s= 0.01.
- We also leave all other settings at default.
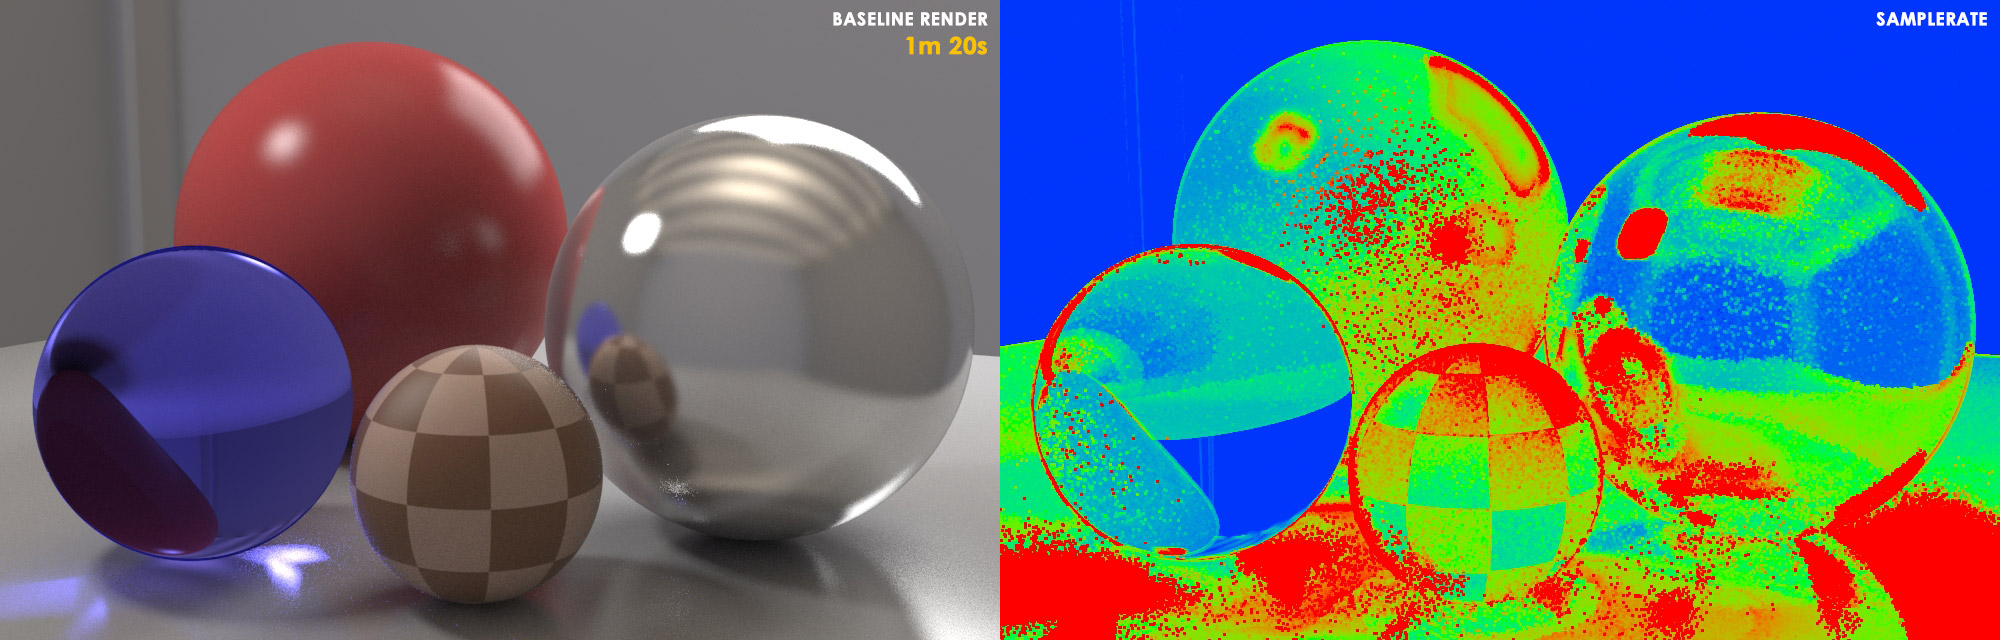 Figure 3. Basic render.
1min & 8max Subdivs = Image Sampler (AA)
8 Subdivs = Lights, GI and all materials
Now let's take a closer look at what happens during a basic render. Through the render settings, you kind of tell the render:
“I allow you to use up to 64 (8 Subdivs) Primary Samples (AA) in each pixel so that you understand what is happening there in the scene and do not make as much noise as the noise threshold allows... But for each of these Primary Samples, you you can create only 1 Secondary Sample to understand what is there in terms of light, shadows, GI and materials.”
You may be wondering: “Wait, just one Secondary Sample for light, GI and all materials? Yes you drive! There should be 64 Samples (8 Subdivs), didn’t we specify that many?” Well, it's important to note that ICs (lights), GIs, and materials have a value of 64 Samples (8 Subdives) each - V-Ray divides this value by the AA Max Samples in your scene. Despite the value of 64 Samples for lights and materials, you should keep in mind that this value is divided by the value of AA Max = 64 Samples (8 Subdivs), resulting in only one Secondary Sample for lights, GI and materials. (64 Secondary Samples / 64 Primary Samples = 1 Secondary Sample).
The reason V-Ray does this is because of the internal formula it has set to keep these two values in balance. The logic of the developers is as follows: the more Primary Samples, the proportionally fewer Secondary Samples are required to understand what is happening in the scene (we will soon see that this is not always true). This balancing act between Image Sampler and DMC Sampler may not be clear to you at first, but that's the point. The takeaway is that when you increase the Image Sampler (AA) value, V-Ray tries to compensate by proportionally decreasing the DMC Sampler value. Later, if you haven't fallen asleep yet, you can evaluate DMC Calculator, which was written by the author of this article, which I so diligently translate at 5:02 in the morning, almost without using a dictionary =) Thanks to gymnasium No. 32 in Ivanovo, where I received 8 English lessons a week.
And so, let's return to our parrots:
V-Ray rendered as cool as it could, but I am alarmed by the huge number of red pixels in the SampleRate render element). This is what he tells us:
“I couldn’t figure out what was happening in the scene because you severely limited me in the noise threshold. I used Primary Samples with just one Secondary Sample for a long time but it didn't give me enough information about these areas."
If we look at the render, we'll notice that while the objects (the edges of objects) look pretty good, there are still some noisy areas in the image where there are shadows and reflections. We've got a noisy base render and we have two options to reduce the noise to get the quality we want.
* Option 1 - increase AA Max Subdivs - so that V-Ray can see the scene better, but again with just one Secondary Sample for light, GI and materials.
* Option 2 - Increase quantity Subdivs in materials, lighting and GI. Tell V-Ray to keep the number of Primary Samples, but instead allow it to use more Secondary Samples.
Scene example - option 1 - increasing the value of AA MAX SUBDIVS
Well, let's try first, in the way that crooked visualizers usually do to get a less noisy render.
- We increase Image Sampler (AA) 1min & 100max Subdivs.
- We leave IP, GI and materials on 8 Subdivs.
- Lower the Noise Threshold to 0.005 to tell V-Ray that we want to render without noise.
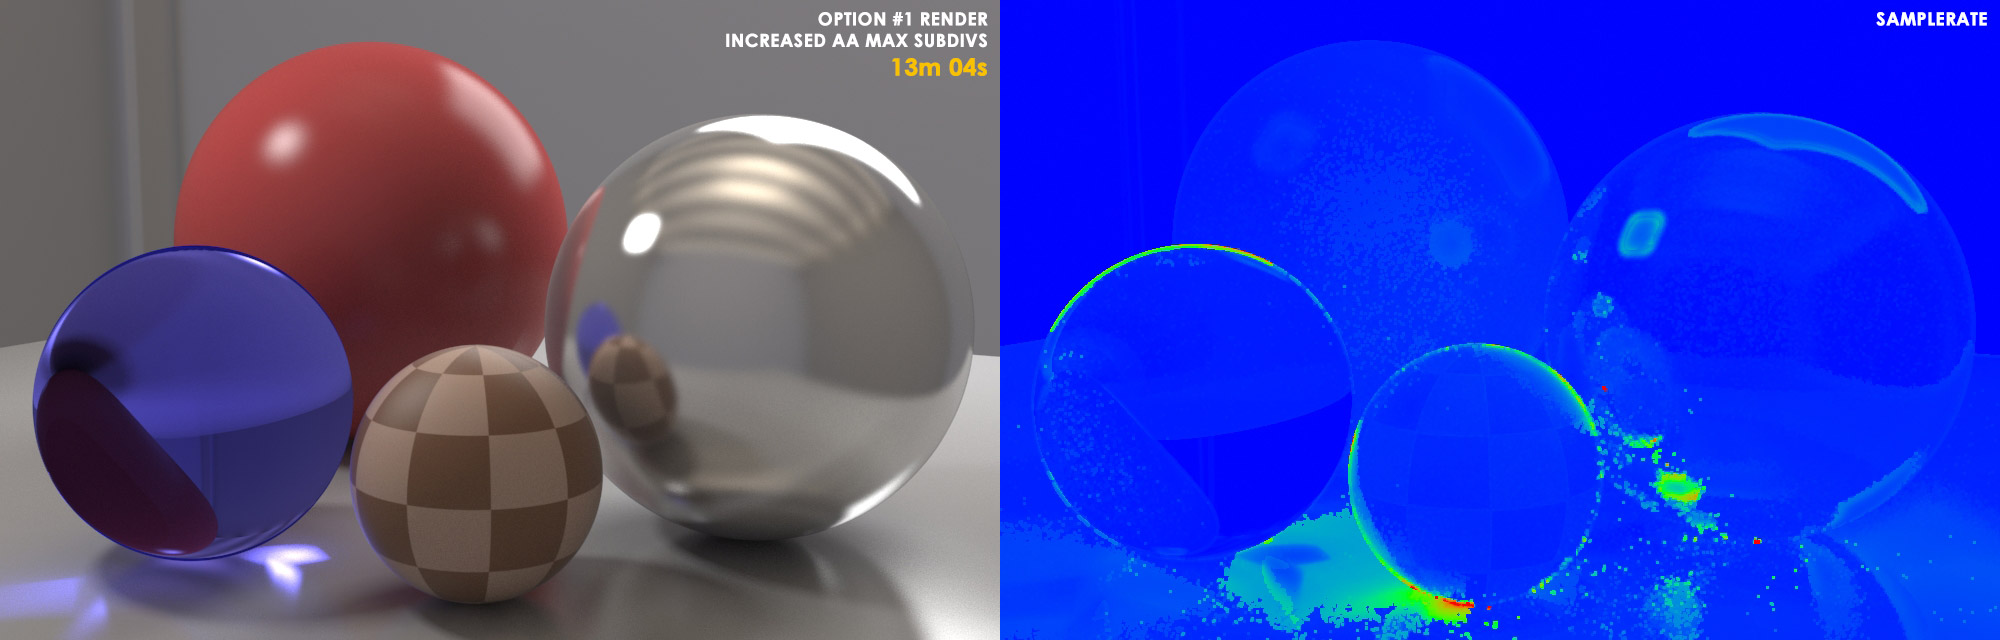 Figure 4. Option 1 - increasing the number of subdivisions in AA Max
1min & 100max Subdivs = Image Sampler (AA)
8 Subdivs = BC, GI and all materials
0.005 = Noise Threshold.
Let's figure out what happens with these settings. Having set these settings, we tell V-Ray:
“I allow you to use up to 10,000 (100 subdivs) Primary Samples (AA) per pixel to understand what is happening in the scene and minimize noise as much as possible at a given Noise Threshold. But, for each Primary Samples, you can create only one Secondary Sample in order to understand what is in the scene with light, GI and materials.”
We remember that because Each IC, material and GI have 64 Samples (8 Subdivs), V-Ray divides this value by AA Max Samples. Although the value is 64 Samples, it is divided by AA Max 10,000 Samples (100 Subdivs), resulting in a minimum number of just one Secondary Sample for lights, GI and materials. (64 Secondary Samples / 10000 Primary Samples = 1 Secondary Sample).
V-ray finishes rendering the image and says:
“I could figure out everything that was happening in the scene for the quality and clarity of the picture that you specified. But in order to test the scene, in some places I had to use as many as 10,000 Primary Samples with 1 Secondary Samples for light, GI and materials.”
We look at Option 1 and see that the amount of noise has decreased significantly compared to the base render. Rendering time increased to 11 min 44 mec (9.8 times longer). But we have no noise. Most people at this point will think that this is the best result that can be obtained and that, like, it’s ready.
But what if we look at option 2, which we talked about earlier? Despite increasing AA Max Subdivs, what would happen if we instead increased the subdiv values in IS, GI and Materials. Let's find out.
Scene example - option 2 - increasing the number of subdivisions in IS, GI and materials
Now let's try something new. Let's set the Primary Samples value to what it was in the basic settings, but add Secondary Samples.
- We leave Image Sampler (AA) at basic settings 1min & 8max Subdivs.
- We increase the number of subdivisions in IP, GI and materials to 80 Subdivisions every.
- Leave Noise Threshold 0.01
 Figure 5. Option 2 - enthusiastic number of subdivisions in IS, GI and materials.
1min & 8max Subdivs = Image Sampler (AA)
80 Subdivs = Lights, GI, and Materials each.
0.01 = Noise Threshold.
And so, let's look at what happens in the second option. By setting render parameters like this, you are telling V-Ray:
“I allow you to use up to 64 (8 subdivs) Primary Samples (AA) per pixel to understand what is in the scene and up to 100 Secondary Samples.”
Remember that GI, materials and light are 64,000 samples (80 subdivisions) each. V-Ray automatically divides each of these values based on the AA Max Samples set in your scene. And despite 64,000 samples, it is divided into AA Max 64 samples (8 subdivisions), and only 100 secondary samples for lights, GI and materials (each). Secondary Samples / 64 Primary Samples = 100 Secondary Samples).
V-Ray finishes rendering and says:
“I could tell what was going on in the scene based on the noise threshold quality level you set. In fact, most of the time, I had to use all 64 Primary Samples per pixel. And 100 Secondary Samples for light, materials and GI."
We see that the noise is gone, but the rendering time has increased by 4.5 times (4m 38s) compared to the base render.
But if we compare with option 1, we see that option 2 gave us cleaner results and rendered 2.2 times faster.
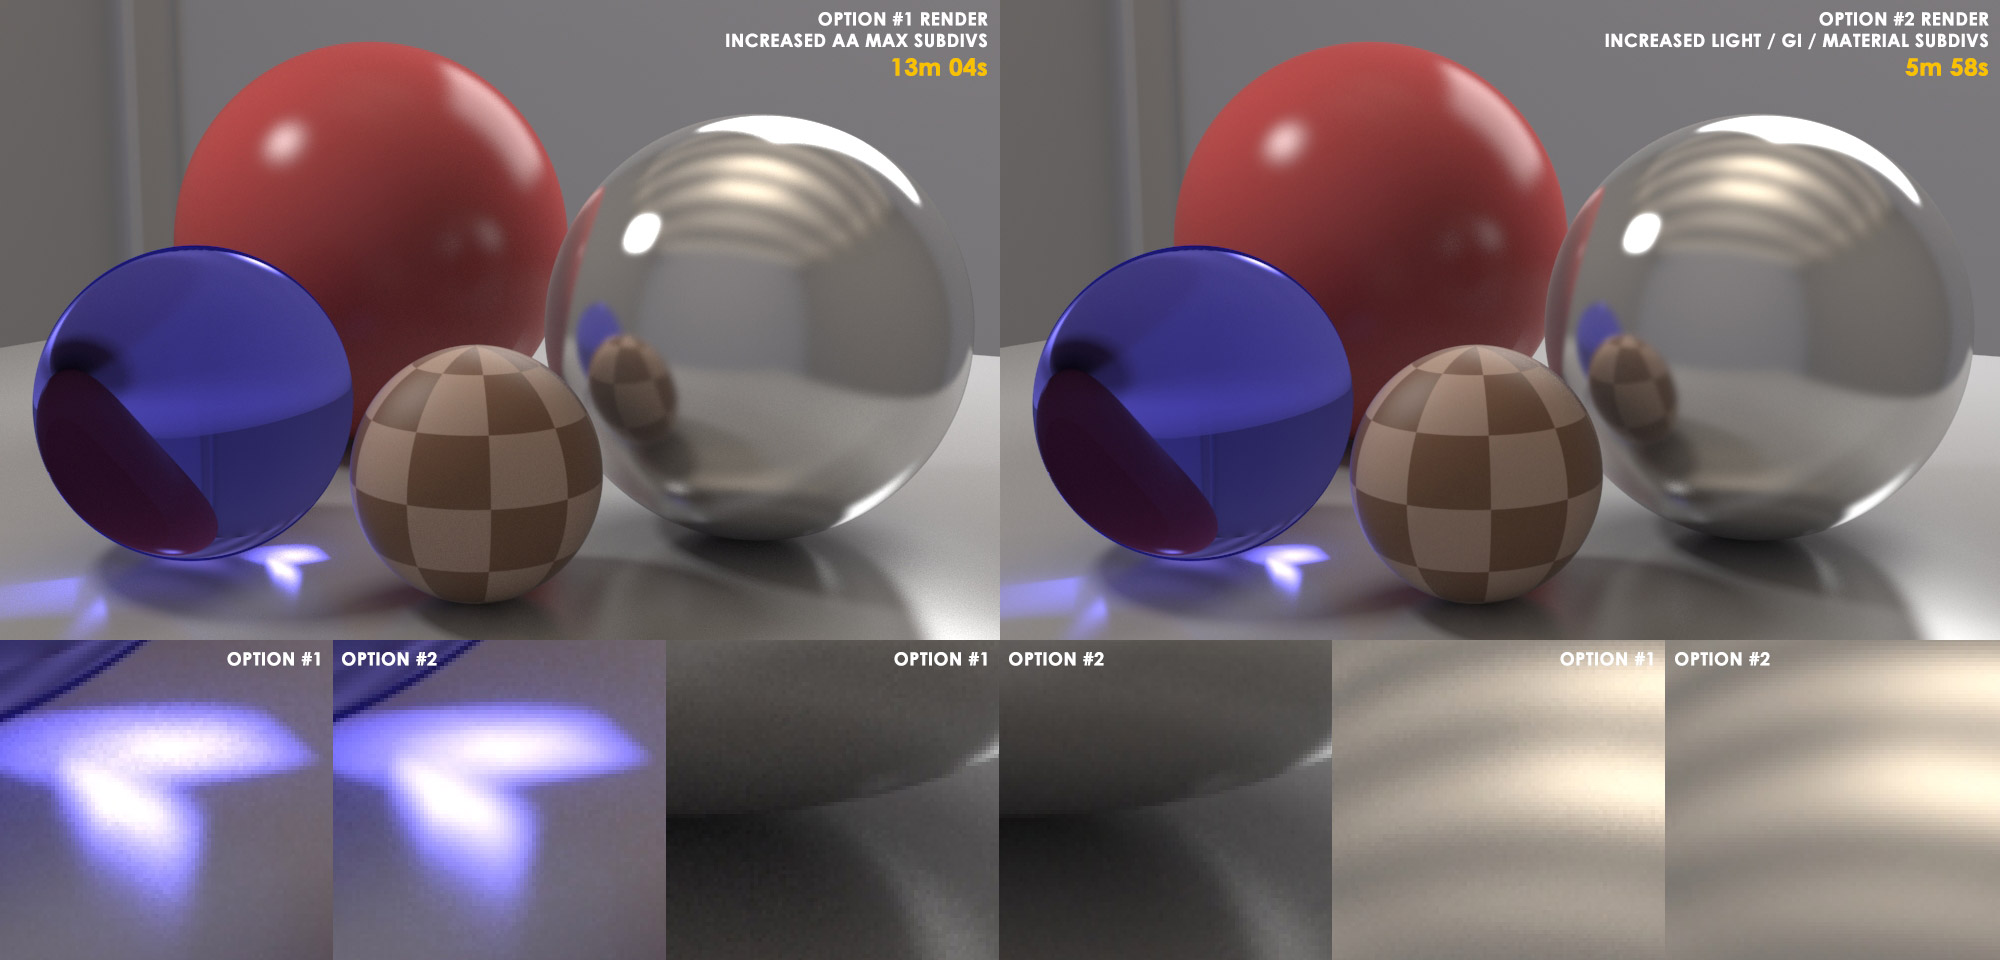
Figure 06. Option 1 on the left and option 2 on the right. Below is an image enlarged 4 times to better see the difference in noise.
Why is that? Why is increasing the DMC Sampler settings (lights/GI/subdivs materials) better than increasing the Sampler (AA)? The result is faster and cleaner rendering.
How optimization works
In the base render we see that the edges of the object look good, the noise is mainly in reflections and shadows. If you remember what we taught earlier: “Primary Samples (AA) are made to “probe” the main geometry of the scene, textures, DOF and motion blur in the scene. Whereas Secondary Samples “probe” GI, light, materials and shadows.”
And so, to get rid of the noise, choosing between option 1 and 2 is not an easy task. Why use a screwdriver to do the job of a hammer? Image Sampler (AA) has already done what it was designed to do - make geometric detail (the edges of objects) clean and silent. So, instead of shooting a bunch of extra Primary Samples (AA) into the scene to remove noise, it's better to add samples to the DMC Sampler (lights/GI/Material Subdivs), let it do what it was designed for - remove noise in the shadows, lighting, GI, reflections and refractions. Here's our answer!
Now we can see why the "Universal V Ray Settings" of 1min and 100max AA will generally not be the most efficient method of rendering a scene - in fact, it was never intended to be the most efficient method! V-Ray's Universal Settings were designed to make V-Ray accessible and easy for users who don't care about optimization and don't bother with how V-Ray works under the hood. It's just a way to put V-Ray on autopilot. This allows the user to control the entire rendering quality by adjusting just one parameter - the noise threshold. If there is too much noise in the render, simply lower the noise threshold, and V-Ray will keep firing Primary Samples (AA) until it finally reaches the noise threshold.
But we can optimize option 2 even more! From 5min 58s before 4min 53s. With a slight increase in noise.
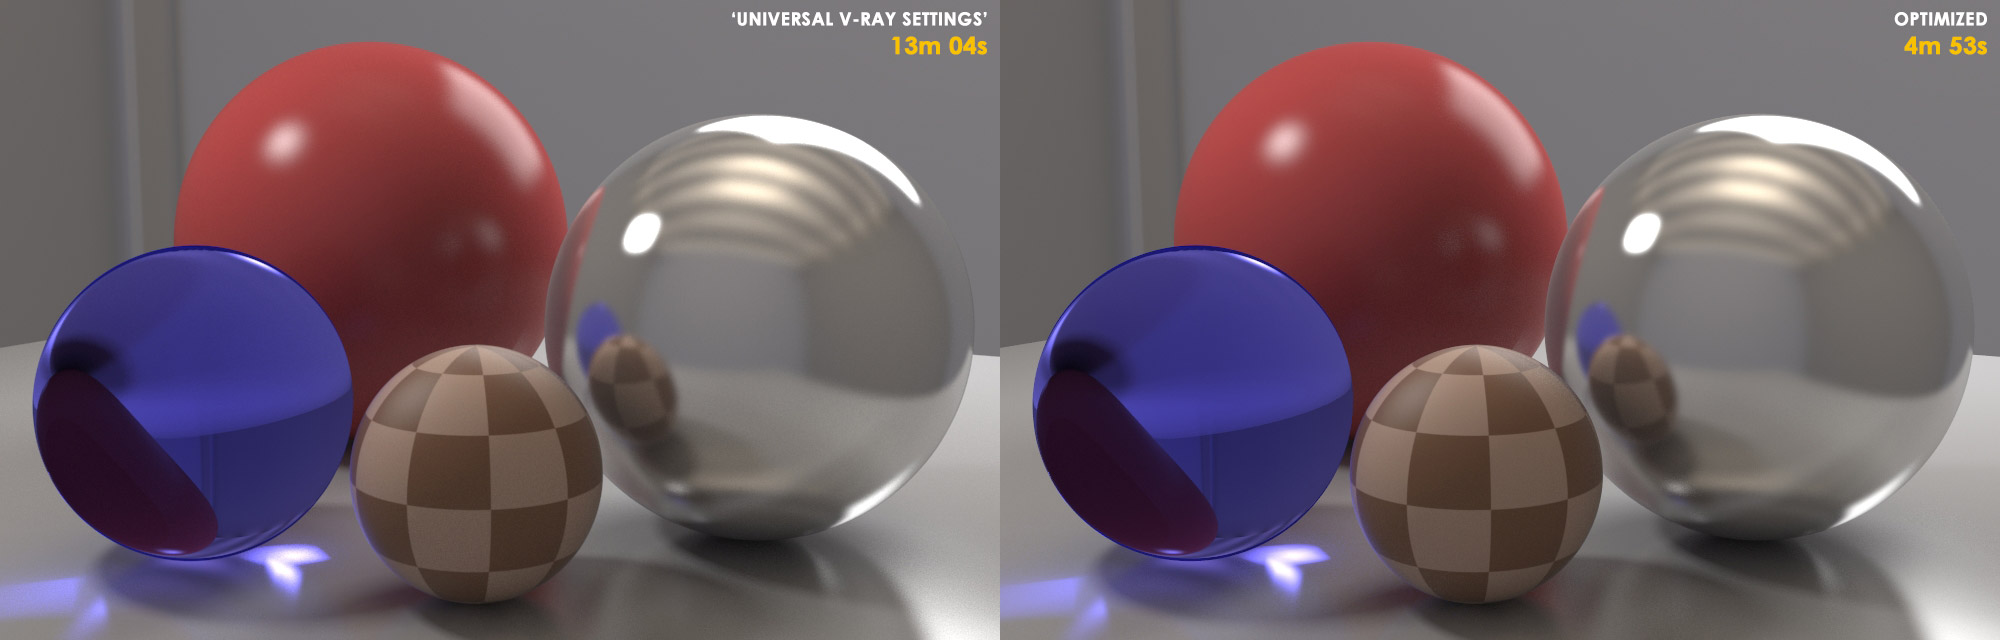
Figure 07. Option No. 1. On the left, and Option No. 2 The render is optimized even more - on the right. Rendering speed increased by 2.7x!
Here's another example of optimization, this time more focused on scene performance.
Optimized rendering (right) is said to be nearly 35% faster than the generic rendering settings (left) while reducing noise and improving rendering quality. Also note how the reflections have become more accurate - noticeable on the floor towards the end of the corridor.

Figure 08. “Universal V Ray Settings” on the left, and optimized render on the right.
To be continued…
Very important, looking forward to the continuation.
A necessary thing, I support the author.
Looking forward to the continuation!!!
Great lesson, a continuation would be a nice gift.
By the way, turn on RSS, you have some great articles, I’d be happy to read new ones
I join, looking forward to the continuation.
I do it in Maya, but the explanations are very helpful!
Great article...waiting for news!
The article is nonsense. Rendering time at the same quality will be less if you turn the subdivisions to minimum and the color cut to maximum. Yes, half of the picture will be red. So what. The AA sampler fights noise better than subdivisions on each element. It is a fact.
At least someone doubted the correctness, otherwise one gets the feeling that all the comments above were written either by bots or by people who did not understand what they were writing about, after reading the article once.
as if the article was written by a dude from Blur if you know what it is, the original is by Akin Bilgic. It seems to me that there are no fools in Blur just to write such things))
Where are the continuation of the articles?
The author does not keep his word...((
in 2016, with the advent of Corona Render, this article is no longer relevant. I never got around to translating the article.
Thanks to the author
Blessings to you and your home